
Converting a Knitted Lace Chart For the Kniterate Design App

Pattern 60 from Knitting Lace by Susanna E. Lewis imagined as a sleeve
NOTE: Shortly after I posted this, I learned that Susanna E. Lewis had passed away. Susanna was a fiber artist, an author, and my teacher at Parsons School of Design in the late 80s. We were recently in touch again and she enjoyed hearing about Kniterate. She sent me her Knitting Lace book that prompted me to explore lace knitting a little more in depth. I will miss her.
I was recently asked two questions about knitting on the Kniterate from two different people. The first person, who has access to a Kniterate, wanted to know if hand knitting charts could be converted to instructions for the Kniterate. The second, who is considering a Kniterate, asked for more details after reading my earlier post on knitting pointelle. I’ll attempt to answer both questions in this post.
As far as converting a hand knitting chart to instructions for the Kniterate, I think it pretty much depends on how complex the stitch pattern is and one's understanding of hand knitting. Though I’m not a handknitter, I’m familiar with the basics as they relate to machine knitting. A hand knitted stitch translates to a knit stitch on the front bed as the fabric comes off the machine. A purl stitch is the same as knitting on the rear needle bed of the machine. A slipstitch is a miss stitch on a machine or what happens when a needle doesn’t knit. Knitting one below in handknitting is created by tucking on a machine.
There are often ways to make handknit stitch patterns on a machine, especially if using hand manipulation on a hand-operated machine. Some of these manipulations cannot be converted for machines that are not hand-operated. Other operations will translate well. Though a basic hand knitted cable is the same cable on the machine, for instance, it takes a good understanding of stitch size, stitch transfer operations, pitch, and roll distance to program cables for a Kniterate.
Then there’s lace. Stitch size and the other parameters must still be tested, but many of the charts seem to convert to Kniterate instructions in a straight forward manner.
I’m using Pattern 60 in Susanna E. Lewis’s Knitting Lace. The book is an amazing collection of 91 knitted lace patterns from a mid-19th century lace sampler. Besides the written instructions for the stitch patterns, Susanna provides charts and a “Machine Knitters’ Glossary” with instructions for doing hand manipulations on a hand-operated single bed machine.
When knitting on a true double bed domestic machine or on any machine with automatic transfers, however, it’s generally easier to do the main lace knitting on the front bed (FB). Knitting on the FB makes it easier to read and use a hand knitting chart.
Essential in the book is a description of the knitting associated with each hand knitting symbol. These descriptions are located in the “Glossary of Symbols and Techniques” section. Some descriptions and illustrations were of complex hand knitting stitches (e.g. wrapped stitches), which can’t be knitted on automatic machines. This info was very useful because it helped me decide which patterns I did not want to knit on the Kniterate.
As mentioned earlier, the machine knitting section is for knitting on a rear bed and so these illustrations showed the technical back of the lace as it’s knitted. The illustrations were clear enough for me to imagine the stitches from the other side. I didn’t use Susanna’s “streamlined decreases”, which ignore the order of multiple stitches on a machine needle. Since the Kniterate has back to front and front to back transfers in both directions plus racking capability, I could control the order of the each stitch on a needle for this stitch pattern.
I chose Pattern 60 because there are never more than two stitches at a time on a needle (two stitches knitted together) and there are never left leaning and right leaning stitches in the same row. I wanted it easy and safe!
Converting the Symbols to Kniterate Instructions
This is row 1 on Pattern 60 from Knitting Lace.

All the white squares are knitted on the front bed (FB) needles. The grey are purls knitted on the rear bed (RB). Multiple transfers must be executed before knitting and purling this row.
All the left leaning line symbols (including both \ and ⋋) indicate that once the transfers for this course are completed, the stitches in positions 4, 5, 6, and 7 lean to the left. The circle at needle #8 is an eyelet; that is, there will be no stitch on needle #8 once transfers are completed. Here is the sequence I used to prepare and knit row 1:
Edited 9 Dec 2022 for Kniterate editor v0.2.22; edited 5 Oct 2024 for Kniterate editor v1.0.12
Transfer stitches on needles #4-8 from FB to the RB.
Transfer stitches on needles #5-8 from RB to FB one position to the left. The rear bed racks one position to the left and the stitches are transferred to the front bed. These racking and transferring steps are handled by painting the downward left arrow with the 1. (Note that after racking, the four stitches that were originally on FB needles 5 through 8 are now opposite FB needles 4 through 7.) No adjustments for racking are used in the options columns when the diagonal arrows are used.
Transfer the stitch on needle #4 from RB to FB. The rear bed racks back to the neutral position. Stitch #4 is placed on top of the stitch transferred from needle #5.
Make one pass of the carriage set to knit both beds of needles. Needles #1-3 will knit. Needle #4 will knit 2 stitches together. Needles #5-7 will knit. A yarn over is created on needle #8. Needles #9-12 will purl on the rear bed. This completes row 1 of the stitch pattern.
The next row, as well as all the even rows of Pattern 60, is a simple pass of the carriage with all needles knitting. Pattern 60 has 16 rows altogether.
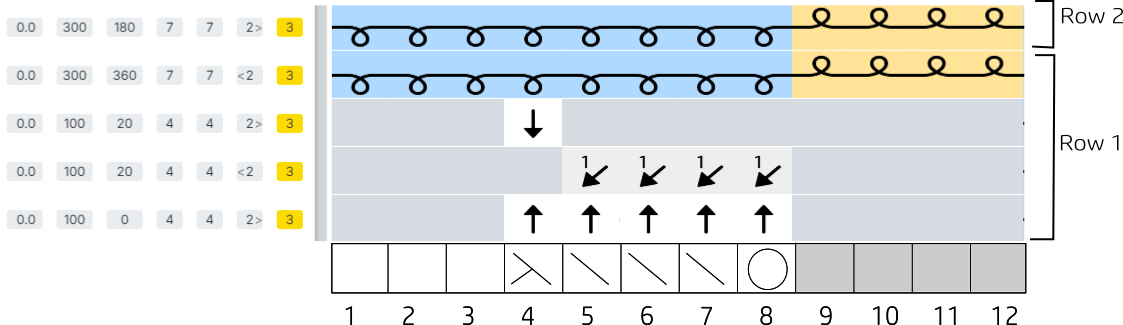
Above is a screenshot of Pattern 60 rows 1 and 2 in the current version of the Kniterate design app. When knitting the stitch pattern, the machine will not transfer the stitches from adjacent needles. On rows with more than one transfer, every other stitch will transfer on one carriage pass. The remaining stitches transfer on the next pass.
The wool yarn I used is wc 2/12 (Nm 6.77) and very springy. After steaming, there is good depth to the stitch pattern as in the picture at the top of this page, looking almost like a cable. The combination of springy wool and this stitch pattern make the rib element prominent and the straight knitted stitches lean toward the place where two stitches are knitted together, a look I love. Stretched at the side edges and pinned almost flat, you can see rows 1 and 2 in the red rectangle below.

Pattern 60 from Knitting Lace by Susanna E. Lewis
At some point it will be interesting to explore more complex lace patterns from the book and work with other yarns.
O!
As a Kniterate ambassador I’d be happy to give you a virtual tour of the machine. If you’re a Kniterate owner, you may be interested in my prerecorded Designing with Kniterate classes.