
Machine Knitting a Textured Buttonhole Band
Sometimes, when I want to program a very complicated stitch pattern on the Kniterate, I’ll do a test on my manual Passap DM-80 first. This process helps me think in an orderly way about complicated moves and see how a complex stitch pattern physically develops in real time, before I deal with the digital version.
Recently, I worked out a buttonhole band this way. The band is pretty standard, but I didn’t know how the closed edges on each side of the buttonhole would appear, since I was adding racking to the mix. It turns out the buttonholes look good, though the band may not be right for my current project.
Below is a tutorial for this racked buttonhole band experiment, and I include an update on my cardigan project. If you enjoy this type of content, be sure to subscribe on YouTube, where I also publish YT Posts (short updates) between videos.
Related Links
Knitted Vertical Buttonhole by Diana Sullivan [YouTube] — A basic buttonhole band, good for those new to double-bed knitting
The Racking Workshop — Learn more about racking and bring more texture to your knits with my online pre-recorded course for knitters on Kniterate, Passap, Superba, and Japanese-style machines.
Tips for Kniterate Knitters
Lower the roller value when racking.
Use half the roller value for the buttonholes. Change feeders every two rows.
Since I’ve decided against using this type of button band for my current project, I have not yet test knitted it on the Kniterate. A knitting sequence, modified for the Kniterate, is presented below, along with suggested options settings.
Tips for Knitters on Japanese-style Machines and Superba
Never bring needles into holding position for a racked sequence!
For each buttonhole, working needles on each bed are brought into upper patterning position. Non-knitting needles are in lower patterning position. Cams are set to miss (slip or part).
Video Transcript
If you've been following along with my cardigan project, I'm making progress. Even though I'll soon have all the pieces, I still haven't decided on the type of finish I'd like for the front opening. So, I'm going to share my experiment for a button band, or more exactly, a buttonhole band, and I'll demonstrate it on a manual machine. If I decide to knit it, I'll most likely knit it on the Kniterate.
Stay tuned if you want to see my tutorial for a buttonhole band with a little texture. And I'll update my cardigan.
Hi, Olgalyn here. My personal projects always take a backseat to other projects, so this cardigan is a little slow going, but I'm happy to report my progress. First of all, I corrected my incorrect gauge figures. The numbers looked a bit odd to me, so I'm glad I rememeasured and recalculated. I have a perfectly sized front left, front right, and back left. I'm also ready to knit the rest.
I got a little surprise at the top of the funnel neck. I wanted to keep the scallops from the swatch I talked about last time. But when I made the funnel a little shorter, as I said I would, I ended the pattern on a different row. This had an effect on the top edge that I hadn't counted on. The scallops are not as deep. It's not as scallopy.
The Kniterate did the bindoff and after the fabric relaxed a bit, the edge became a bit crinkly, which I really like.
(The transcript continues below the image.)
The fabric is very stretchy. That I've known from the beginning. I'm going to rely on the seams to help stabilize the cardigan. Besides the shoulder seams, the back gusset and side seams will all do their part. I'm counting on the button band and the buttonhole band to do the same thing for the front opening.
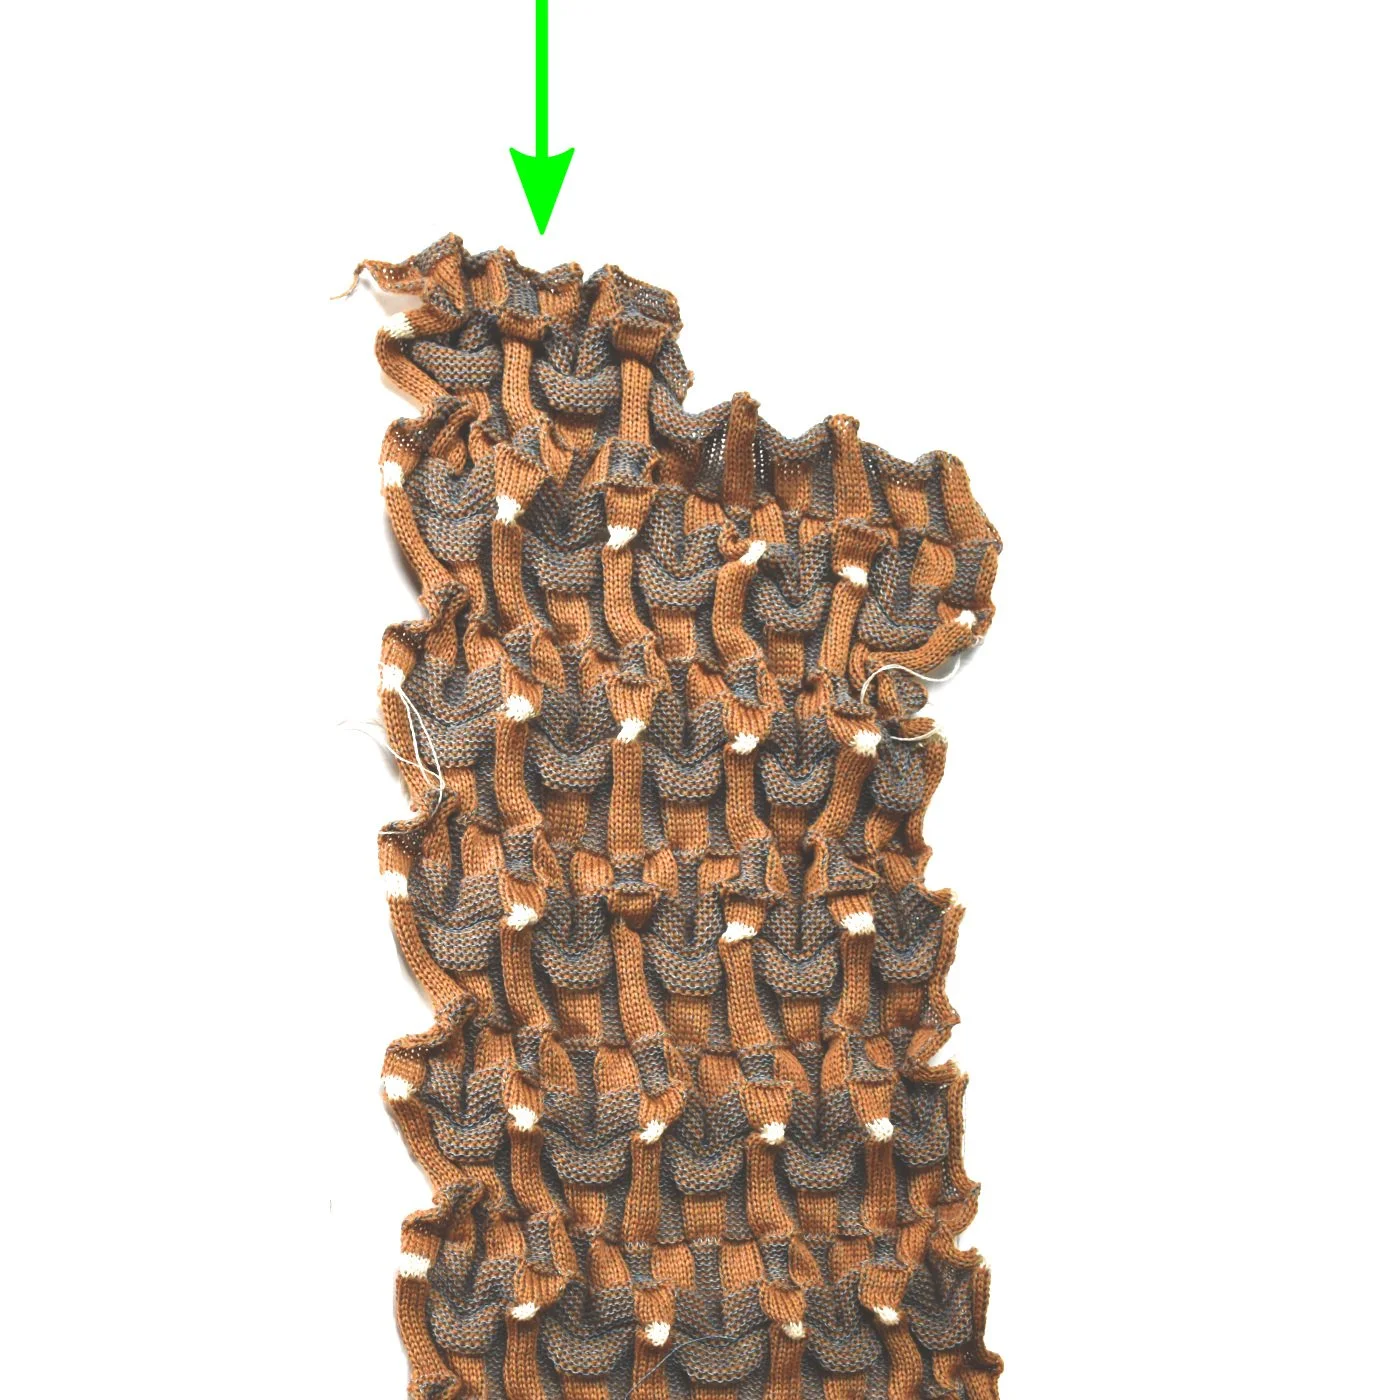
So, even though I haven't knitted all the pieces yet, here's my first experiment with a button band and a buttonhole band. Pretend I have different buttons. These buttons do not go with the cardigan. They were handy and they're the right size. You'll see the surface has a bit more texture than the usual full needle rib or 1x1 rib, which are often used for a button band.
I borrowed the stitch pattern from a tote bag strap and added vertical buttonholes. I'm still deciding on this type for my cardigan. If I were knitting, say, a double jacquard cardigan, I would use it, but I'm not sure it's exactly what I'm looking for right now.
It's a full needle rib structure across 10 needles on each bed. What adds the texture is racking, moving one needle bed laterally. Besides racking, the buttonhole band uses missed stitches and there's a free pass. In other words, moving the carriage to the other side of the machine without knitting and without the stitches falling off the needles.
My demo is on a Passap. Kniterate knitters, follow the link in the description to notes on knitting the band on your machine. If you are on a Japanese style machine or a Superba and you are already comfortable with your machine, you can knit the same buttonhole band by setting your cams to slip, miss, or part depending on your machine with only selected needles knitting when you get to the buttonhole. Remember, never pull needles up into holding position if you are racking.
Like my other tutorials, this one is for machine knitters who are beyond the beginner stage of knitting. If you are a beginner knitter, you may be familiar with some of these operations and others you may be unfamiliar with. But if you'll stick around, you will see what's possible. And just by practicing your knitting and thinking logically about your knitting, you may already know more than you think you know.
Also, stay around to the end. I provide a link to a YouTube video for a vertical buttonhole band that's great if you haven't had a lot of experience with double bed knitting yet.
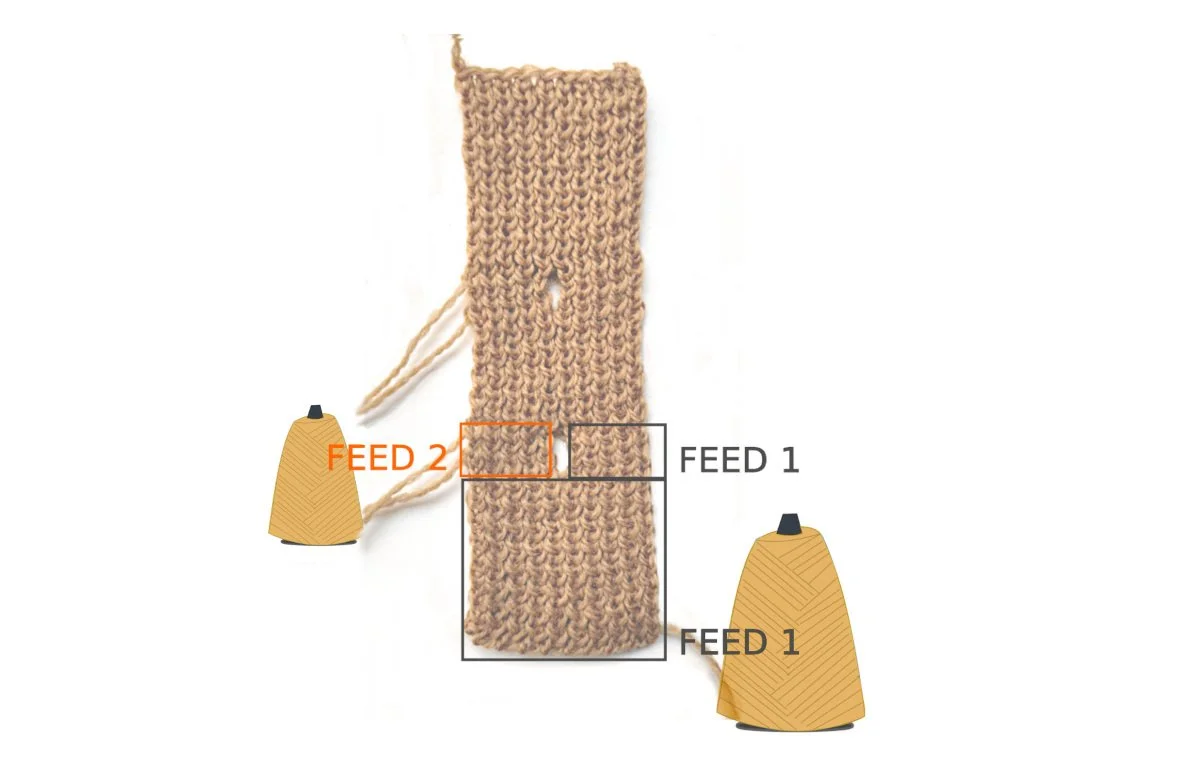
So, here's how I knit the textured buttonhole band. Cast on for full needle rib. We'll be using two yarn feeds for this.
This is a vertical buttonhole. And when we get to the buttonhole, we use short rows so that only one side of the buttonhole is knitted at a time. We'll have one source of yarn on the right for the right-hand side of the buttonhole and another small source on the left for the left side of the buttonhole.
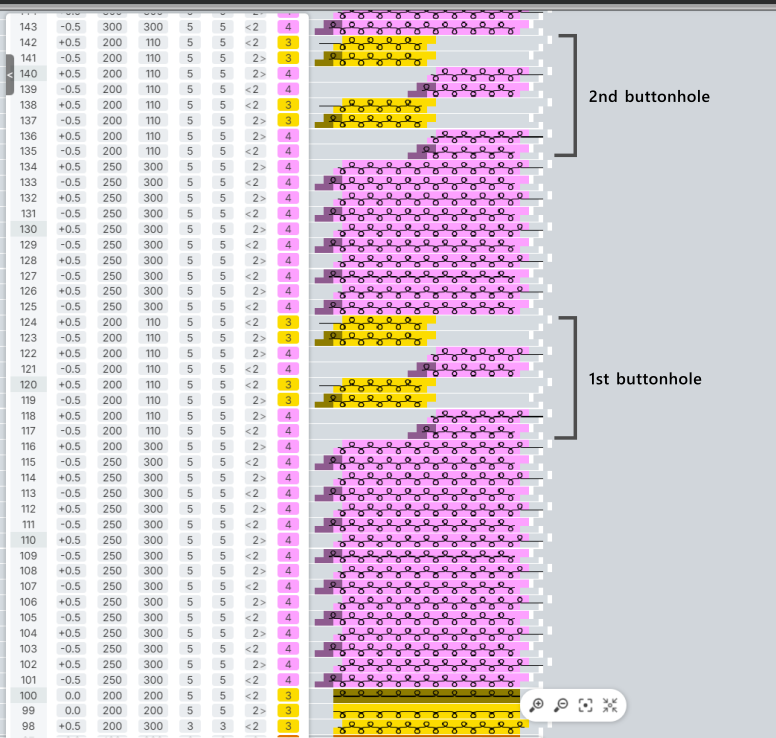
The knitting sequence I used after cast-on started with my carriage on the right. Sixteen rows to begin, 4 rows for the right side of the buttonhole, 4 rows for the second side of the button hole, ten rows before I started the second button hole. Then repeat for the next buttonhole. I ended with 16 rows and a bind-off.
But remember I said there was racking involved? It's easy to remember when to rack because you rack before each row after cast-on. Always rack one in the first direction. Knit a row. Rack back to the original position. Knit a row. Follow that sequence throughout the band. I'll demonstrate now.
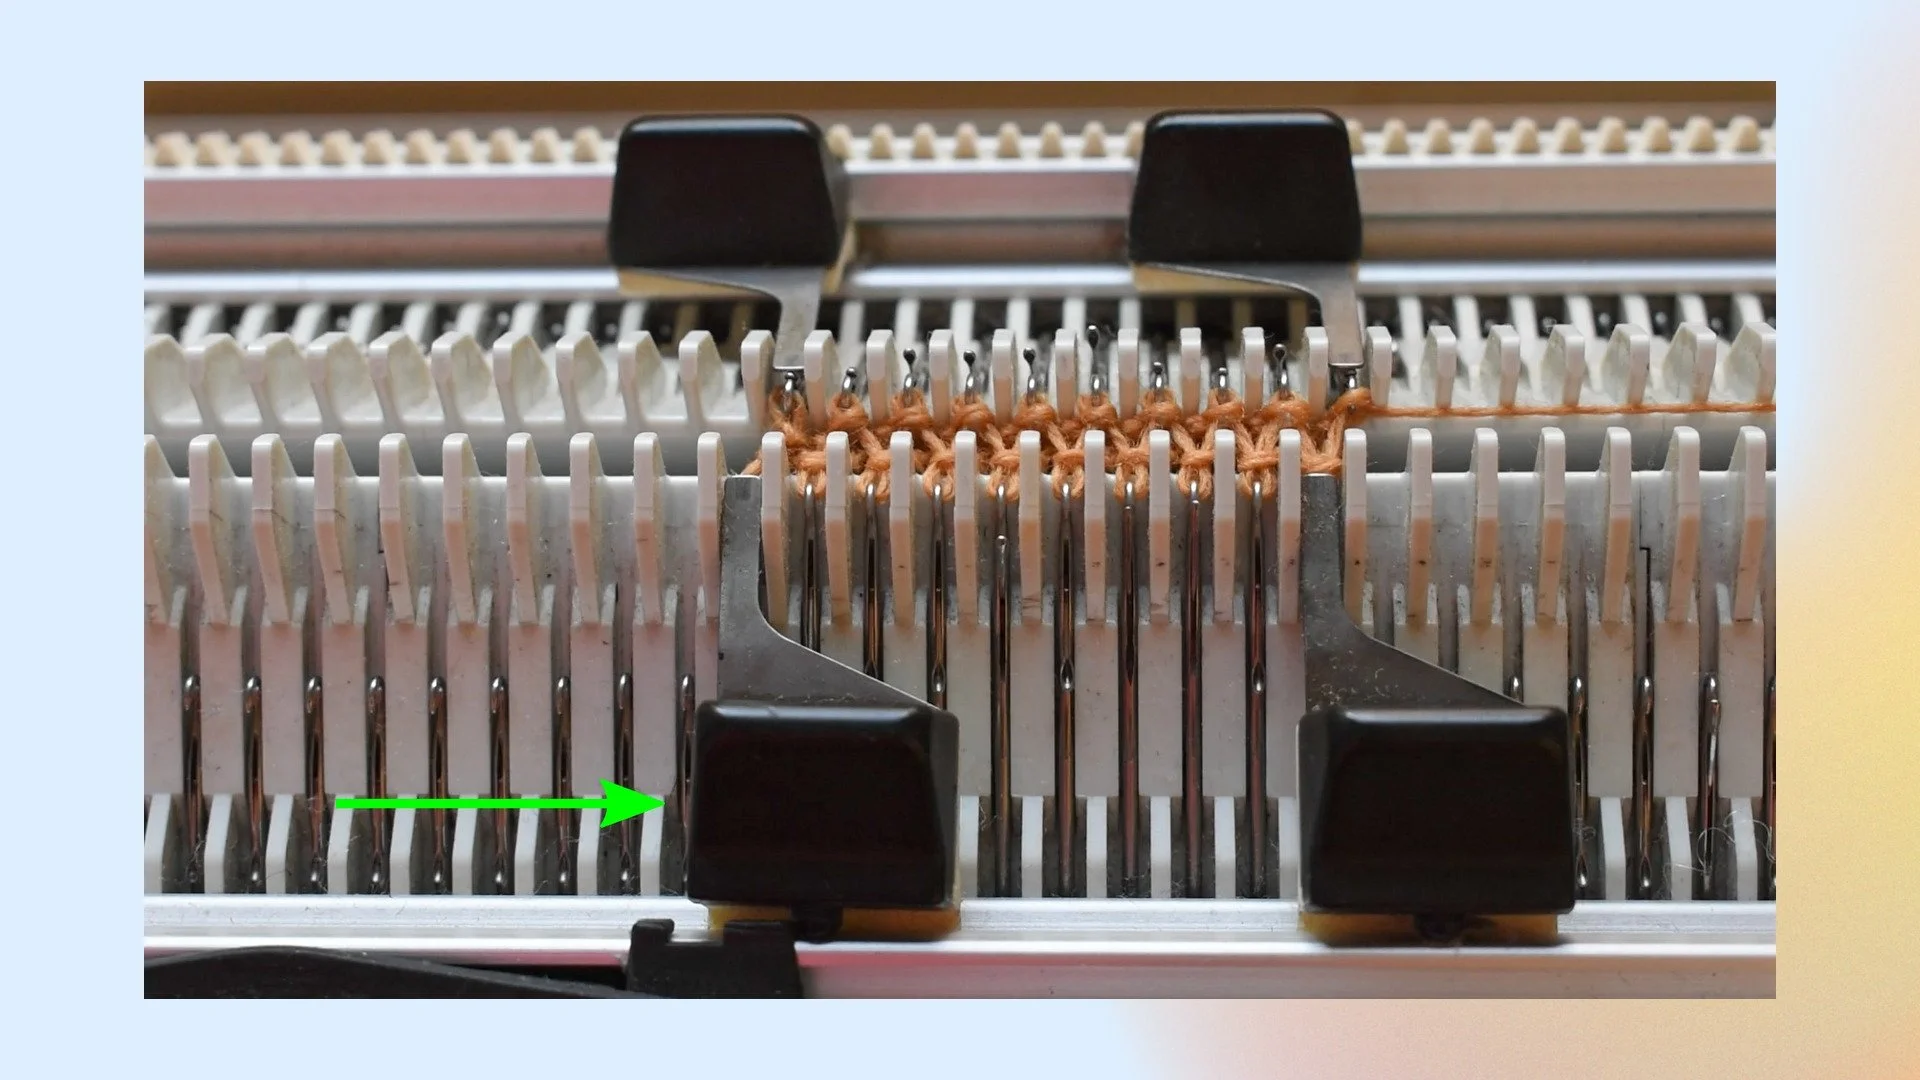
But before we begin, if you haven't seen these before, these are edge springs on a Passap machine. They help keep the edge stitches on the needles. You don't really need them for this band if you use weights.
(The transcript continues below the image.)
And Passap knitters, you'll notice I'm using the orange strippers. You're set to BX or LX on each bed with the pushers in working position for the needles in use.
I'm going to start my buttonhole on the right and knit the right-hand side of the button hole first, but the buttonhole band can be started from either side. So, we've cast on. My band is 10 needle pairs wide. The beds are at half pitch. I've observed the needle rule with the first needle from the left on the front bed and the last needle on the right side on the rear bed. But you may have a different arrangement depending on your needs and if you want a seam allowance.
My back bed racks on the Passap or if I were knitting on the Kniterate, so I'm racking to the left first. If you're using this setup on a Japanese-style machine or a Superba, your front bed racks and you'll be racking your front bed to the right first.
Here we go. Rack one pitch in your first direction. Knit a row. Rack back. Knit a row. Do that sequence eight times, so 16 rows in all. The carriage is on the right-hand side.
Now, here's the fun part, the actual buttonhole part. Passap knitters, put the five pushers on each bed down into rest position on the left-hand side. We are about to knit the right-hand side of the buttonhole band. Here we go. Rack in your first direction. Knit one row. Rack back. Knit one row and repeat, four rows altogether.
If you're on a manual machine, remove your yarn from the carriage. Free pass so that no needles knit or fall off the needles and bring your carriage to the other side of the machine. Your second source of yarn should be on the other side waiting for you.
Bring those Passap pushers up into working position. The five needle pairs further away from the carriage will be not knitting.
I'm going to knit the left side of the buttonhole now, same sequence. Rack in your first direction. Knit. Rack back. Knit. And repeat that, so you'll knit four rows.
Remove your yarn from the carriage. Free pass so that no needles knit, and bring your carriage to the other side of the machine. Set all your needles to knit and knit until you want to begin your second buttonhole.
Now, if you're just getting started with double bed knitting and you want to knit a vertical buttonhole band, Diana Sullivan has a video demonstrating another version of a vertical buttonhole band. And there's no racking. It uses 1x1 rib on a Brother machine and begins knitting on the left-hand side. If you would rather use a 1x1 rib and you also need basic instructions, check it out. The link is in the description.
Then come back to this video once you have the foundation and you're looking for a more textured look.
Now, this is a pretty sturdy band. The more I look at it, the more I think I should experiment with other buttonhole bands. Maybe something based on an I-cord. If you have thoughts or ideas on this, please let me know in the comments.
I'm Olgalyn. This is knitting in the fast lane. 'Til next time.
O!
If you’re a Kniterate user, you may be interested in my prerecorded Designing with Kniterate classes. If you’re not an owner yet, I’d be happy to give you a virtual tour of the machine.